GANs-Generative Adversarial Networks and Their Implementation
The targeted audience of this blog is beginner students.
Imagine a world where reality and fiction blur together seamlessly. Where you can't trust your own eyes and ears. Welcome to the era of GANs and deepfake technology.
Imagine watching a video of your favorite celebrity giving a speech, only to realize later that it was never them at all, or seeing human-generated faces that never existed on Earth.

gif source: betsmove
Shocking Right!
Or have you ever wondered how computers create realistic images from scratch?

image source: Alter AI
You've probably heard of some famous image-generation tools like MidJourney, Stable Diffusion, and DALL-E. These are well-known image-generation models. They generate images that look incredibly real.
But Did you think that behind the scenes how these models generate these images?
This blog will teach you about GANs (Generative Adversarial Networks), the powerful image generation architecture that makes it all possible.
What you will learn?
In this blog, you will learn how image generation works and dive deep into how neural networks generate images through code implementation.
By the end of this article, you'll understand the fundamentals of GANs, how they work, and their applications in creating realistic images.
What are GANs?
Generative Adversarial Networks (GANs) are a class of artificial intelligence algorithms used in unsupervised machine learning, introduced by Ian Goodfellow and his colleagues in 2014.
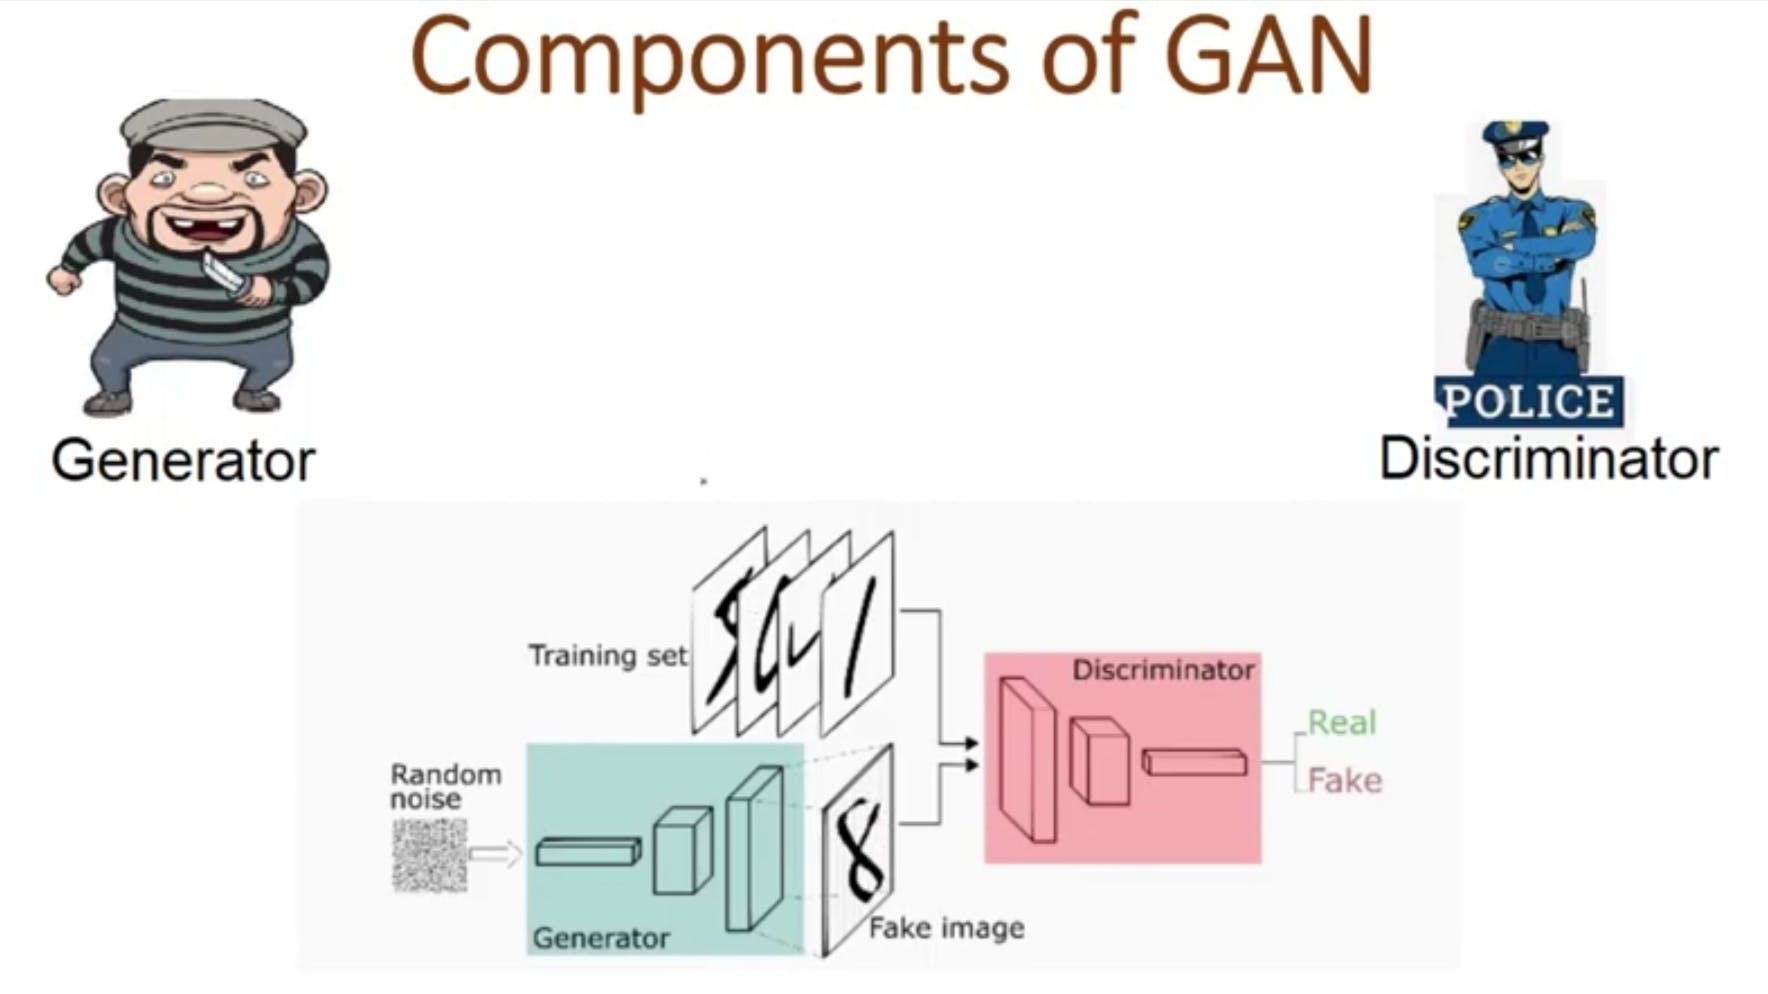
GANs are a Neural Network architecture that involves two neural networks, and it is a type of game between these two neural networks. One neural network generates something from random noise, and the other one classifies between the generated noise and real image samples. This is a class of machine learning framework.
Example: A game between the police and a thief and time by that time both are getting experts in our work in every epoch.

How are GANs implemented? 🤔
In GANs architecture there are two neural networks for generating something new from random noise.
The first neural network is called the Generator.
The second neural network is called Discriminator.

Image source: Analytics Vidhaya
In this game, the generator generates images from noise until the discriminator says they are real. In reality, the generated image is fake.
How GANs Work Internally!
GANs involve training two neural networks, the generator, and the discriminator, in a competitive setup. The generator creates realistic images from random noise, while the discriminator determines their authenticity.
Both networks are trained simultaneously, with the process iterating until the generator produces images indistinguishable from real ones. The generator adjusts its parameters based on the discriminator's feedback.
Get a probability score from the discriminator for image authenticity. Adjust the generator's parameters using this feedback and generate a new image. Repeat until the generator fools the discriminator. Both networks learn and adapt simultaneously, making GANs effective at creating realistic content.
Type "I understand " in the comment if you understand

GANs Architecture 🔭
Let's See the Architecture of GANs

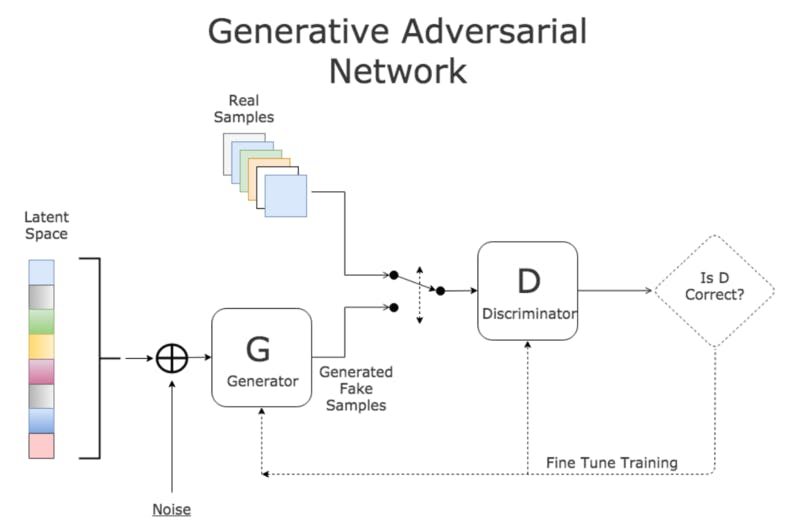
image source: AI curious
The Latent Space is nothing but random noise.
Just take a look at the picture, and you'll see how the generator uses random noise to make some cool fake samples.
Next, both the real and fake samples get sent to the discriminator.
And guess what? When you give the fake sample to the discriminator, it treats all the labels of those fake images as if they were real! How cool is that?
Okay! Got it
So, what we're doing here is kind of like a friendly trick. We give the discriminator both real and fake samples, but we tell it that the fake ones are real too. This way, we're helping the discriminator become smarter as both networks learn together.
By setting the label of the fake samples as real, we're making it a bit more challenging for the discriminator to tell the difference between real and fake samples. But don't worry, our clever discriminator gets better and better with every round of training! 😄
When the first Epoch is completed Our Loss will be calculated and Backpropagation Start :)
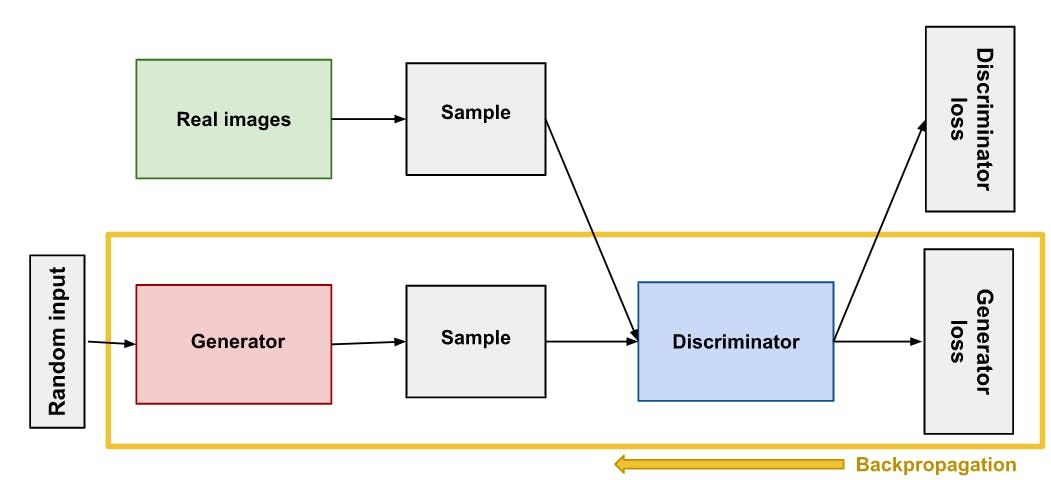
The Generator and Discriminator Loss will Calculate

image source: GDG
After this, The Backpropagation starts 😀
GAN backpropagation plays a super important role in fine-tuning the generator and discriminator neural networks during training. What it does is calculate the loss function, which shows the difference between the discriminator's output and the actual label (real or fake) of the input image. Then, this loss is sent back through the network, updating the weights and biases of each neuron to minimize the loss.
As time goes by, the generator gets better and better at making images that look just like real ones, since both networks learn and grow together. Thanks to backpropagation, GANs can whip up super realistic content for all sorts of cool stuff, like image and video editing, virtual reality, and gaming! 🎮🌟
In some moments, the image whipped up by the generator becomes almost impossible to tell apart from a real image. When the discriminator can't tell the difference between real and fake images, we know our image is good to go.
Applications of GANs
Photorealistic Image Generation: generates high-resolution, photorealistic images of objects, scenes, and even human faces.
Art Generation and Style Transfer: create novel artworks and artistic designs.
Video Generation and Editing: generate realistic video sequences, including deepfake videos that superimpose faces onto existing videos.
Medical Image Synthesis: generate synthetic medical images for applications such as medical image analysis, disease diagnosis, and treatment planning.
GANs Limitations
Training Instability: GANs can be difficult to train due to the need for a delicate balance between the generator and discriminator. If one becomes too strong, training can fail.
High Resource Consumption: Training GANs often requires significant computational resources and time.
Evaluation Challenges: Measuring the quality and diversity of generated images quantitatively is difficult.
Data Dependency: Insufficient or poor-quality data can lead to unsatisfactory results.
Risk of Overfitting: The discriminator can overfit the training data, reducing its effectiveness in guiding the generator to produce realistic outputs.
Conclusion
Our main goal is to create an image and improve it with each step, reducing the loss until the discriminator can't tell if it's real or fake.
Congratulations! 😋
You Learned GAN!
Code Implementation
First, you need to import the TensorFlow Library.
import tensorflow as tf
Generator Code
# Define the generator network
class Generator(tf.keras.Model):
    def __init__(self):
        super(Generator, self).__init__()
        self.dense1 = tf.keras.layers.Dense(128, activation='relu')
        self.dense2 = tf.keras.layers.Dense(256, activation='relu')
        self.dense3 = tf.keras.layers.Dense(784, activation='sigmoid')

    def call(self, inputs):
        x = self.dense1(inputs)
        x = self.dense2(x)
        return self.dense3(x)
Definition:
self.dense1 = tf.keras.layers.Dense(128, activation='relu')- This creates a dense (fully connected) layer with 128 neurons and a ReLU (Rectified Linear Unit) activation function.
Definition:
self.dense2 = tf.keras.layers.Dense(256, activation='relu')- This creates another dense layer with 256 neurons and a ReLU activation function, stored as
dense2.
- This creates another dense layer with 256 neurons and a ReLU activation function, stored as
Definition:
self.dense3 = tf.keras.layers.Dense(784, activation='sigmoid')- This creates the final dense layer with 784 neurons and a sigmoid activation function, stored as
dense3. Typically, this would be used to output an image of size 28x28 (since 784 = 28*28).
- This creates the final dense layer with 784 neurons and a sigmoid activation function, stored as
Let's Talk about the Activation Functions in this code
Activation functions are fascinating components in neural networks. They determine whether a neuron should be activated, helping the network learn and understand complex data. Imagine activation functions as the decision-makers of a neural network.
Imagine you have a magical toy robot.
- This robot can listen to your voice and decide whether to jump, run, or stay still based on how loudly you speak.
Types of Activation Function
Source: medium/Devansh

ReLU (Rectified Linear Unit): It will convert the negative values to zero Positive values stay the same and also it helps networks learn complex patterns quickly.
Sigmoid: Squashes input to a range between 0 and 1 and it's also good for binary classification tasks.
Tanh (Hyperbolic Tangent): Squashes input to a range between -1 and 1 often used in hidden layers to center data.
Softmax: Converts input to a probability distribution over multiple classes and is used in the output layer of classification networks.
Discriminator Code
# Define the discriminator network
class Discriminator(tf.keras.Model):
    def __init__(self):
        super(Discriminator, self).__init__()
        self.dense1 = tf.keras.layers.Dense(128, activation='relu')
        self.dense2 = tf.keras.layers.Dense(256, activation='relu')
        self.dense3 = tf.keras.layers.Dense(1, activation='sigmoid')

    def call(self, inputs):
        x = self.dense1(inputs)
        x = self.dense2(x)
        return self.dense3(x)
Simple Analogy
Think of the Discriminator as an art critic:
ReLU Layers: These layers help the critic learn to identify complex features of genuine art.
Sigmoid Layer: This final decision layer gives a probability score.
# Create the generator and discriminator networks
generator = Generator()
discriminator = Discriminator()
Loss Functions
Loss Functions are nothing but those functions that measure how well a neural network is performing, it's calculate the difference between the network's predictions and the actual values
The goal of training the network is to minimize this difference.
Analogy for Loss Function
Imagine you are baking cookies:
- Taste Score (Loss Function): Measures how far your cookies are from the perfect taste. The closer the taste, the lower the score (error).
Goal: Adjust your recipe (predictions) to make your cookies taste as close to perfect (target) as possible.
Binary Cross-Entropy is a fundamental loss function in binary classification problems, Its purpose is to measure the difference between two probability distributions.
# Define the loss functions
generator_loss = tf.keras.losses.BinaryCrossentropy(from_logits=True)
discriminator_loss = tf.keras.losses.BinaryCrossentropy(from_logits=True)
Training the GAN
We will be going to train the GAN for the next 100 epochs during the training loss and accuracy will be calculated.
# Train the GAN
for epoch in range(100):
    # Generate fake images
    fake_images = generator(tf.random.normal([128, 100]))

    # Train the discriminator
    discriminator_loss_real = discriminator_loss(tf.ones_like(fake_images), fake_images)
    discriminator_loss_fake = discriminator_loss(tf.zeros_like(fake_images), fake_images)
    discriminator_loss = discriminator_loss_real + discriminator_loss_fake
    discriminator_optimizer.minimize(discriminator_loss, discriminator.trainable_variables)

    # Train the generator
    generator_loss = generator_loss(tf.ones_like(fake_images), discriminator(fake_images))
    generator_optimizer.minimize(generator_loss, generator.trainable_variables)
Generate New Images and Save PNG.
# Generate and save some fake images
fake_images = generator(tf.random.normal([10, 100]))
tf.keras.preprocessing.image.save_img('fake_image.png', fake_images[0])
This is a Very Simple and Straight code implementation.